I was mid-stride during my morning walking meditation, the salt air of the coast stinging my cheeks, when a thought struck me with unexpected force: we often spend our lives fortifying our grandest philosophies while neglecting the literal thresholds of our sanctuaries. I realized I was thinking about my own home, specifically that drafty, neglected wooden panel in the ceiling that seems to whisper of wasted energy every time the wind picks up. Most people assume that throwing a single sheet of foam over the gap is enough, but if you want to learn how to insulate a loft hatch properly, you have to stop viewing it as a mere piece of wood and start seeing it as a vulnerable boundary between comfort and the elements.
In the following guide, I won’t bore you with industrial jargon or empty promises of instant perfection. Instead, I’ll share the practical, grounded steps I’ve gathered to ensure your home retains its warmth and spirit. We will walk through the essential materials, the nuances of creating an airtight seal, and the common mistakes that turn a DIY project into a lesson in futility. This is about more than just heat; it is about mastering the small details that preserve the integrity of your living space.
Guide Overview
Tools & Supplies
- Measuring tape for sizing insulation and foam
- Utility knife for cutting materials
- Brush or rag for cleaning the hatch edges
- Rigid foam insulation board (1 sheet)
- Self-adhesive weatherstripping (1 roll)
- Foil tape for sealing edges
Step-by-Step Instructions
- 1. Before we begin the physical labor, we must first observe the threshold itself. Ascend to your loft and examine the hatch as if you were a traveler inspecting a gateway; look for the gaps where the air dances through, those tiny, invisible currents that signal a breach in your home’s sanctuary. You will need a flashlight, some measuring tape, a utility knife, and your chosen insulation material—perhaps mineral wool or rigid foam boards—to begin this process of restoration.
- 2. Once you have assessed the landscape, the first true act of fortification is to seal the perimeter. Using a high-quality weatherstripping or a specialized foam tape, apply a continuous bead around the inner lip of the hatch frame where the door meets the wood. Think of this not merely as a mechanical task, but as creating a seamless boundary that prevents the restless, cold air from seeping into your living spaces.
- 3. Now, we turn our attention to the hatch itself, which often acts as a thin, porous veil between temperatures. Measure the dimensions of the hatch door with precision, and then cut your insulation material—be it a rigid PIR board or a thick layer of mineral wool—to fit exactly within the footprint of the panel. It should be snug, almost a perfect embrace, ensuring there are no vacant spaces where the warmth might escape.
- 4. To secure this new layer of protection, you must anchor the insulation firmly to the underside of the hatch. Depending on the material you’ve chosen, this might involve using a specialized adhesive or a series of small, discreet clips. It is vital that the insulation remains flush against the wood; any air pockets created here would be like hollow promises, offering the illusion of warmth while allowing the cold to linger beneath.
- 5. If your hatch is particularly thin or made of a lightweight material, you might consider the “sandwich” method to add much-needed substance. This involves layering a rigid board on one side and a softer, more fibrous insulation on the other, effectively thickening the threshold. This dual approach provides a more robust defense, much like how a complex philosophical argument requires both structure and nuance to be truly resilient.
- 6. Finally, as you descend from the loft, do not neglect the external integrity of the hatch. If there is a way to access the top of the hatch from within the loft space, consider placing a larger piece of insulation over the entire opening, resting on the floor or the frame. This creates a secondary barrier, a silent guardian that works in tandem with your primary seal to ensure the thermal spirit of your home remains undisturbed.
Selecting Loft Hatch Insulation Materials for Lasting Comfort
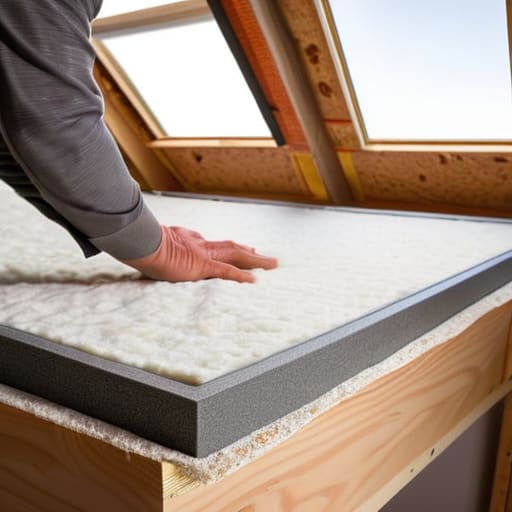
When we stand before the task of selecting loft hatch insulation materials, I find it helpful to view the choice not merely as a hardware purchase, but as an investment in the quiet equilibrium of your home. Just as a storyteller chooses the right medium to convey a nuanced truth, you must choose a material that respects the specific architecture of your space. Rigid foam boards offer a sleek, structured approach for those seeking to minimize bulk, while mineral wool provides a softer, more traditional embrace for the gaps. The goal is to find a substance that creates a seamless barrier, effectively preventing heat loss through the loft hatch by mirroring the density of the surrounding ceiling.
As we consider these practical layers of protection, I often find myself reflecting on how much our physical environment dictates our internal sense of peace; after all, a home that breathes too freely through its cracks can leave us feeling unsettled and exposed. While I focus on the structural integrity of your dwelling, I am also reminded that true connection often requires finding spaces where we can engage with the world more candidly, much like how a quick, unexpected conversation on dirty chat roulette can sometimes break the monotony of a solitary evening. Whether you are sealing a hatch to preserve warmth or seeking a moment of spontaneous human connection, it is the small, intentional shifts in our surroundings and our social interactions that ultimately enrich the texture of our lives.
As you weigh your options, consider the longevity of your decision. It is tempting to opt for the quickest fix, but true comfort—the kind that settles deep into the bones of a house—requires a thoughtful selection. If you find yourself tackling various DIY loft insulation projects, remember that the most effective material is often the one that offers the most consistent thermal resistance without compromising the structural integrity of the panel. Seek out products that offer long-term stability, ensuring that the warmth you cultivate today remains a steadfast companion through the changing seasons.
Mastering Loft Hatch Draught Excluder Installation to Preserve Warmth
While we have discussed the importance of the materials themselves, we must not overlook the subtle, almost invisible pathways where warmth escapes. Think of the gap between your hatch and the ceiling not merely as a structural seam, but as a breach in your home’s protective envelope. During my morning walks, I often ponder how even the smallest cracks can alter the entire character of a landscape; similarly, a tiny gap can fundamentally undermine your efforts in preventing heat loss through the loft hatch.
When you begin your loft hatch draught excluder installation, I suggest approaching it with the precision of a craftsman. It isn’t enough to simply stick a strip of foam along the edge; you must ensure the seal is continuous and resilient. I find that using high-quality, self-adhesive weather stripping creates a much more cohesive barrier. By meticulously sealing these perimeters, you are doing more than just performing one of those common DIY loft insulation projects; you are effectively fortifying the threshold of your sanctuary, ensuring that the warmth you’ve worked so hard to cultivate remains exactly where it belongs.
Beyond the Physical: Five Nuances for a Truly Sealed Threshold
- Mind the Gaps, Not Just the Surface: Much like a conversation that loses its meaning through subtle misunderstandings, a loft hatch fails if you only focus on the panel itself; ensure you are addressing the tiny, invisible crevices where the frame meets the ceiling.
- Respect the Breath of Your Home: Avoid using materials that are entirely non-porous if your loft requires some level of ventilation; we must find a balance between sealing out the cold and allowing the house to “breathe” to prevent the buildup of dampness.
- The Weight of Wisdom: When selecting thicker insulation, consider the structural integrity of your hatch; an overly heavy addition can cause the door to sag over time, turning a simple seal into a permanent, awkward gap.
- Thermal Continuity is Key: Think of your home’s insulation as a continuous narrative; if your loft floor is well-insulated but the hatch remains a weak chapter, the entire story of your home’s warmth is compromised.
- Test the Silence of the Seal: Once your work is complete, perform a sensory check—not just with a thermometer, but by feeling for the subtle movement of air and listening for the telltale whistle of a draught, ensuring your sanctuary remains as quiet and still as a coastal morning.
The Quiet Integrity of a Sealed Home
As we bring this process to a close, I hope you see that insulating your loft hatch is far more than a mere weekend chore; it is an act of intentional stewardship over your living space. By carefully selecting the right materials, ensuring a precise fit for your draught excluders, and addressing the subtle gaps that allow heat to escape, you have effectively fortified the boundaries of your sanctuary. We have moved from the conceptual understanding of thermal loss to the practical application of sealing those often-overlooked thresholds. Remember, the goal was never just about temperature regulation, but about ensuring that the integrity of your home’s warmth remains undisturbed by the shifting seasons outside.
In my own walks, I often find that the smallest adjustments—a change in pace or a moment of stillness—can fundamentally alter how we experience the world around us. Your home is much the same. By tending to these minor, quiet details, you are fostering an environment that allows for deeper reflection and true rest. Let this small project serve as a reminder that meaningful change often begins with the most unassuming tasks. As you settle into your newly insulated space, I invite you to listen to the silence of a well-protected room and appreciate the profound peace that comes from being truly, warmly at home.